


























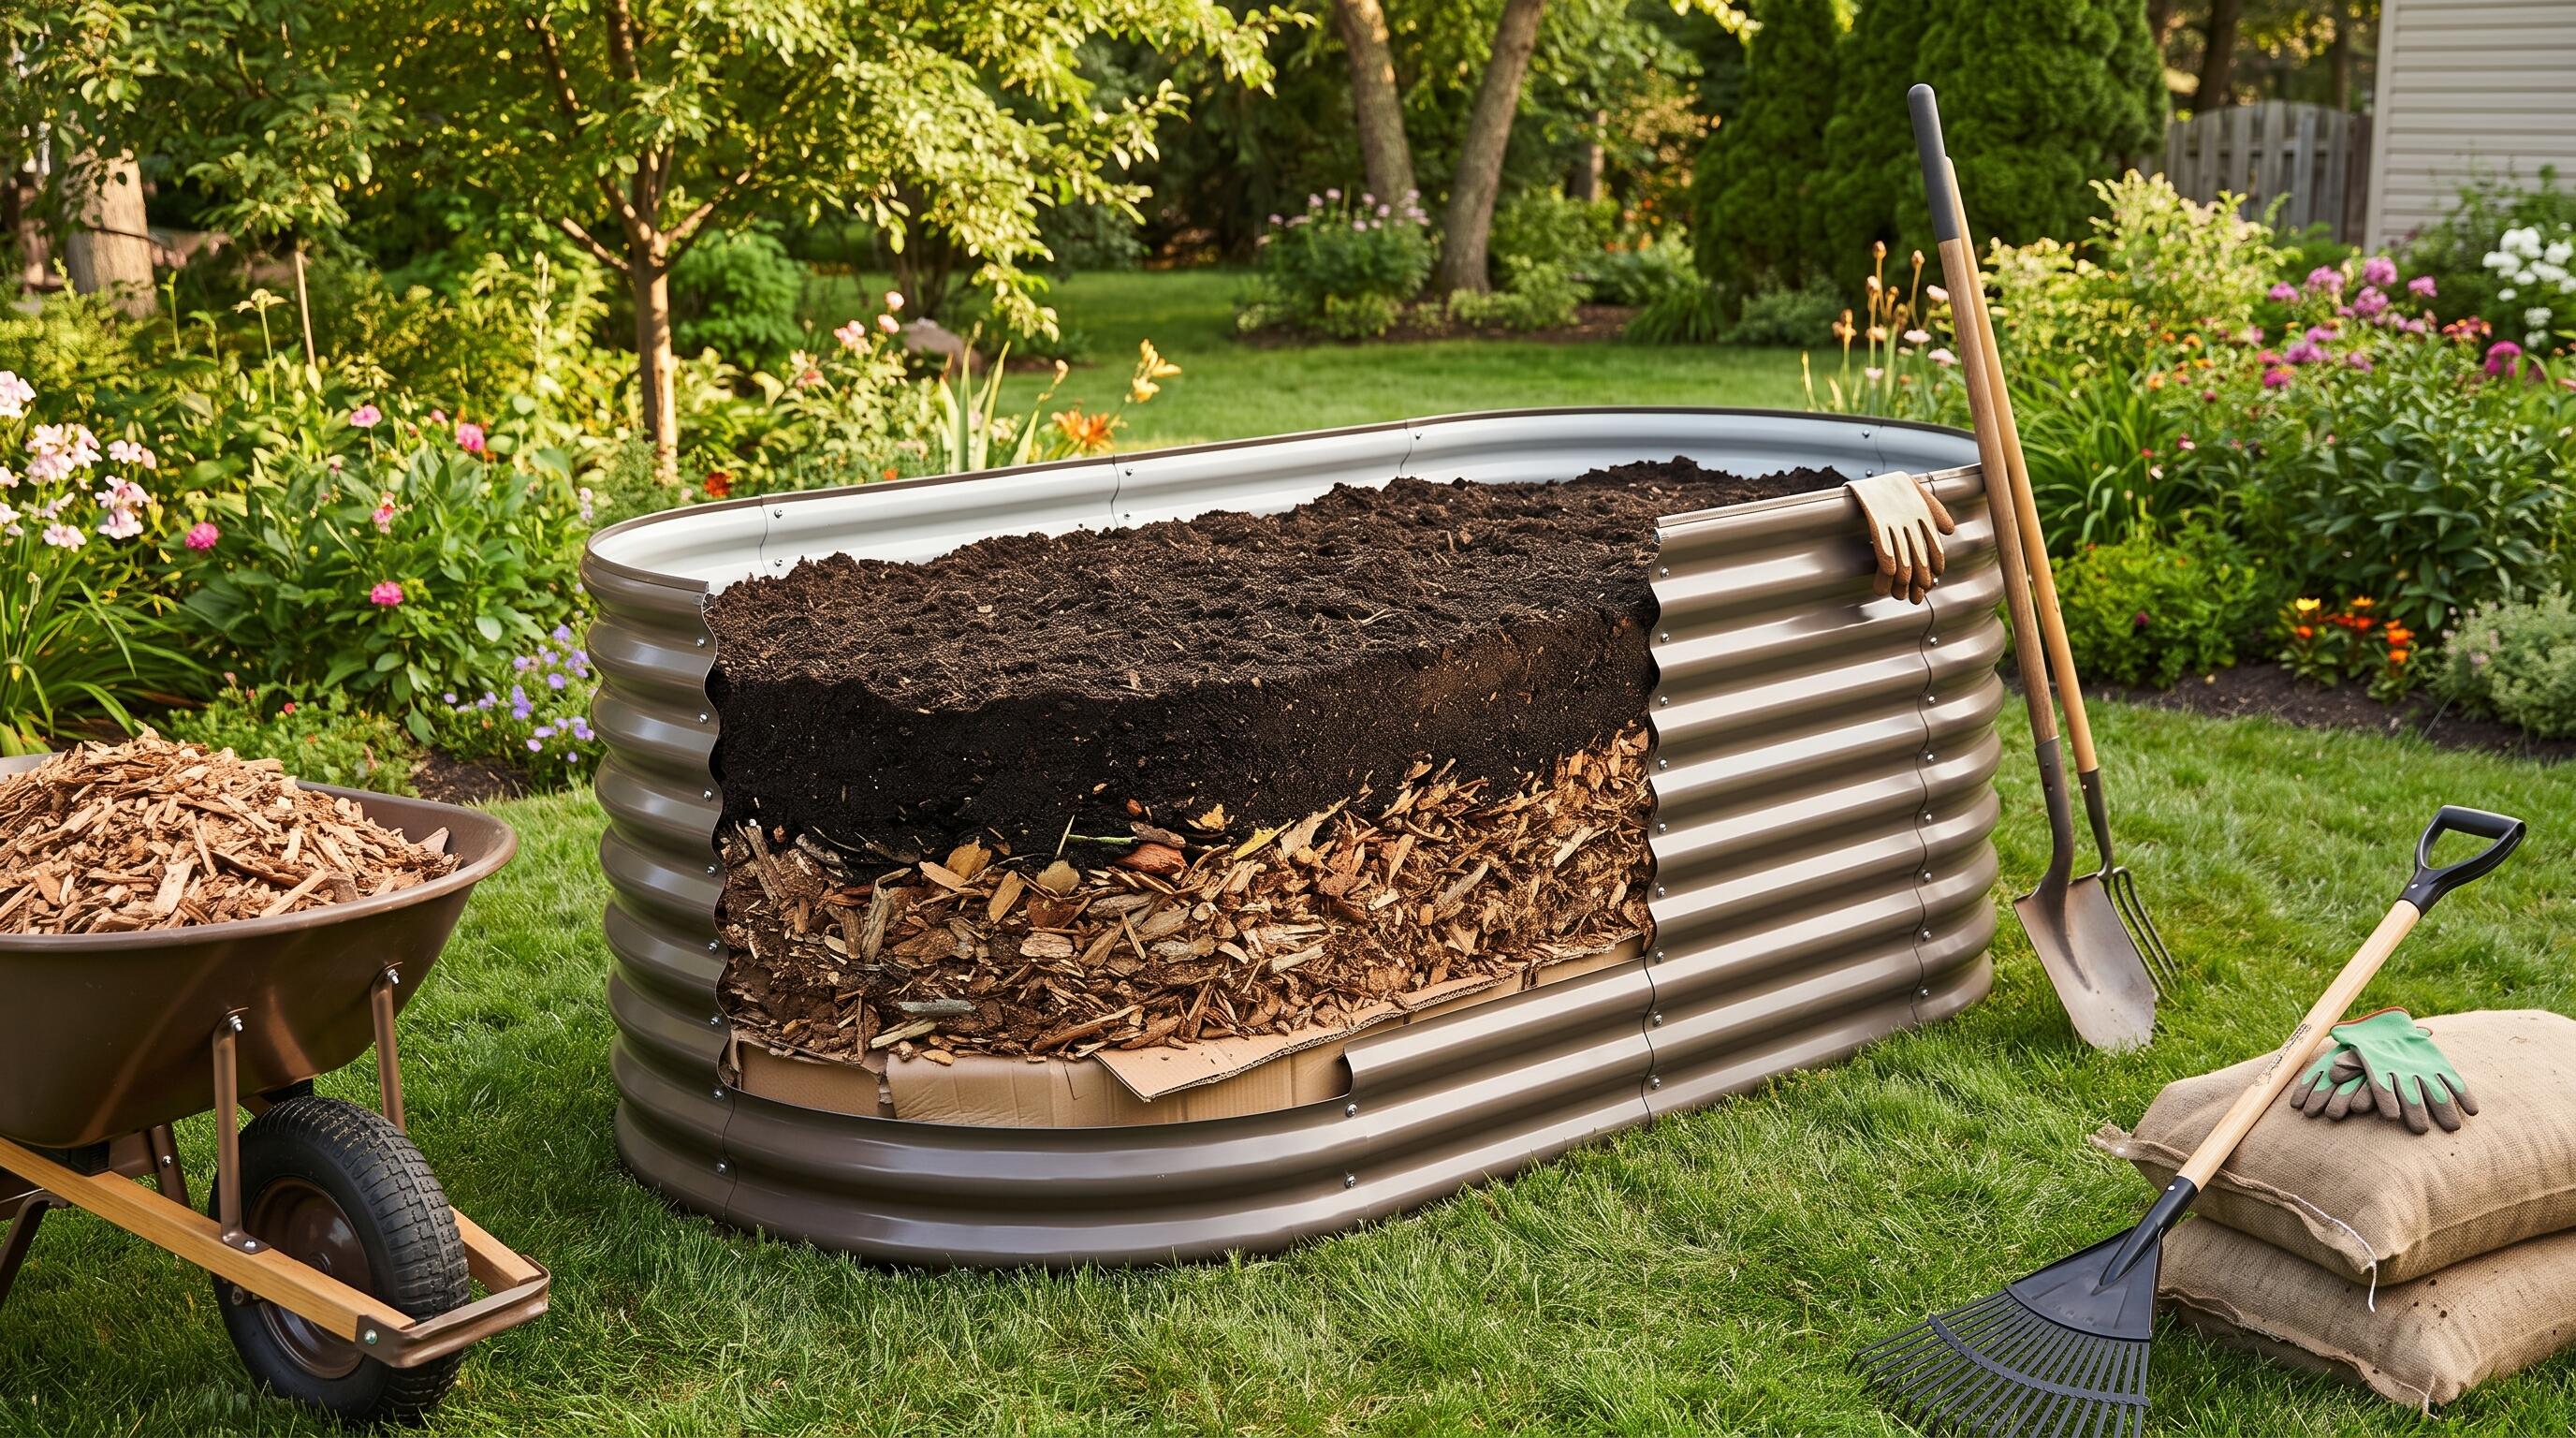
ALT: Layering raised garden bed with compost, cardboard, and wood chips to reduce topsoil costs in backyard garden
Why Smart Gardeners Are Rethinking How They Fill Their Raised Garden Beds
Key Conclusion: Filling a raised garden bed doesn't require spending a fortune on bags of topsoil. By using a strategic layering method — combining organic materials like cardboard, wood chips, compost, and aged manure — you can build a nutrient-rich, well-draining growing environment at a fraction of the cost. This approach, sometimes called "lasagna gardening" or the Hügelkultur method, supports healthy root development, retains moisture efficiently, and improves your raised bed garden layout from the ground up.
If you've priced out topsoil recently, you know the sticker shock is real. For an 8x4 raised bed at just 18 inches deep, you could be looking at hundreds of dollars in soil alone — and that's before you've planted a single seed.
The good news? Experienced home gardeners and horticulturists alike have long known that pure topsoil isn't actually the best growing medium for raised beds anyway. The layering method gives plants a richer, more complex soil ecosystem, encourages deeper root growth, and builds soil fertility over time — meaning less work and less expense every season after the first.
Whether you're setting up your first Anleolife galvanized steel raised garden bed or expanding an existing setup, this guide will walk you through every layer you need, why it matters, and how to make the most of free or low-cost materials you may already have on hand.
Who This Layering Method Works Best For
✅ Applicable Scenarios:
- Gardeners with new raised beds who want to reduce soil purchasing costs significantly
- Home growers filling deep beds (18 inches or taller) where the bottom layers don't need to be premium growing mix
- Eco-conscious gardeners looking to recycle organic waste like fallen leaves, kitchen scraps, and wood chips into productive garden inputs
- Urban micro-gardeners working with limited budgets who want maximum yield from a small footprint
- Anyone converting lawn or weedy ground beneath their raised bed and wanting to smother existing vegetation naturally
❌ Not Applicable/Cautions:
- Beds shallower than 12 inches, where decomposition gases from fresh wood or green material can directly impact shallow-rooted crops
- Gardeners who need to plant immediately and can't wait for materials to partially settle (fresh layers need some time to compress)
- Situations where untreated wood or manure might introduce pathogens — always source materials from reputable, clean origins
The Real Cost Problem With Filling Raised Beds Entirely With Topsoil
Walk into any garden center in spring and you'll see the same scene: stacks of bagged topsoil, and shoppers wrestling with whether to buy 10 bags or 20. The price adds up fast, and many new gardeners default to filling their entire raised bed with store-bought topsoil — only to discover that bagged topsoil alone often compacts, drains poorly, and lacks the biological activity that makes garden soil truly productive.
The raised bed gardening movement has exploded across North America in recent years, and for good reason. Raised beds offer superior drainage, earlier spring soil warming, and better pest control — especially important for health-oriented home growers who want to know exactly what goes into their food. But the soil system inside those beds is just as important as the structure itself.
According to data from the National Gardening Association, food gardening participation in the U.S. has grown dramatically, with millions of households now growing at least some of their own produce. And as more people discover raised bed gardening, the question of how to fill those beds affordably and effectively becomes increasingly relevant.
The layering method — sometimes called lasagna composting, sheet mulching, or a simplified version of the centuries-old European Hügelkultur technique — solves this problem elegantly. Instead of filling every inch of a deep raised bed with expensive topsoil, you build from the bottom up using progressively finer, richer materials. By the time you reach the top growing zone where roots will actively feed, you have a nutrient-dense, biologically active mix — without paying topsoil prices for the whole volume.
This approach aligns perfectly with what makes a durable, productive raised bed: a structure built to last (Anleolife's galvanized steel raised garden beds are designed for a 20-year lifespan), filled with a living soil system that improves every season.
Building Your Layers: A Complete Step-by-Step System
Three-Step Quick Start
Step 1: Prepare Your Bed and Base Layer
Before adding any materials, set up your raised bed on level ground and optionally line the bottom with hardware cloth if gophers or moles are a concern in your area. Then lay down several overlapping sheets of plain cardboard or thick newspaper directly on the ground beneath the bed. This base layer smothers weeds and grass, prevents them from growing up into your bed, and begins decomposing within a few months to feed earthworms. This step takes approximately 20–30 minutes and requires no special tools.
Step 2: Build the Bulking Middle Layers
This is where you replace the bulk of what would otherwise be expensive topsoil. Fill the bottom third to half of your raised bed with coarse organic materials: untreated wood logs or large branches, straw bales, dried leaves, wood chips, or even spent vegetable plants from last season. These materials will slowly decompose and generate heat and nutrients over time. Top this with a layer of nitrogen-rich "green" material — grass clippings, kitchen vegetable scraps, coffee grounds, or fresh garden trimmings — to balance the carbon-heavy browns below. Plan on spending 1–2 hours sourcing and layering these materials.
Step 3: Add the Active Growing Zone on Top
The final 8–10 inches of your raised bed is where your plants will actually live, so invest here. Create a blend of high-quality compost (homemade or purchased), aged manure, and a smaller proportion of topsoil or a bagged raised bed mix. This top layer should be loose, dark, and crumbly. If you're planting root vegetables, make sure this zone is especially deep and free of large chunks. Total setup time for this step is around 30–60 minutes, depending on bed size.
Comparing the Main Layering Approaches for Raised Beds
Not all layering methods are equal, and different approaches suit different situations. Here's a quick comparison of the three most popular systems home gardeners use:
| Comparison Dimension | Lasagna / Sheet Composting | Hügelkultur (Wood Core) | Simple Compost Blend |
|---|---|---|---|
| Cost to fill a deep bed | Very low — mostly free materials | Very low — uses logs and yard waste | Moderate — requires purchased compost or manure |
| Time to plant after filling | 2–4 weeks recommended | Best after 1 season; can plant sooner with thin top layer | Immediately plantable |
| Moisture retention | High — organic layers hold water well | Excellent — wood core acts as a sponge | Moderate |
| Nutrient release timeline | Slow and steady over months | Long-term over 1–5 years | Immediate, may need amendment each season |
| Best for bed depth | Any depth; ideal for 18"+ | Works best in beds 24" or deeper | Works at any depth |
| Labor intensity | Low-moderate | Low-moderate | Low |
| Suitable for immediate planting | With mature top layer | With 8–10" quality growing mix on top | Yes |
Layer-by-Layer Deep Dive: What to Put in Each Zone
The Foundation: Cardboard and Newspaper
Cardboard is one of the most underused resources in the garden. Plain corrugated cardboard (remove tape and staples) laid flat across the bottom of your raised bed creates an instant weed barrier that is completely biodegradable. It also creates a habitat for earthworms, which will begin tunneling up through your layers and aerating the soil naturally.
Use overlapping sheets to eliminate gaps. Wet the cardboard thoroughly after laying it — this speeds decomposition and prevents it from blowing around during setup. Most cardboard breaks down fully within 3–6 months under a raised bed.
The Bulking Layer: Logs, Sticks, and Coarse Organics
For beds that are 24 inches tall or deeper — like Anleolife's Extra Tall and Waist-High raised garden beds — this is where you'll save the most money. Fill the bottom 8–12 inches with untreated wood: small logs, thick branches, or even wood chips. This is the core of the Hügelkultur concept, borrowed from traditional German and Austrian forest farming.
Wood is a slow-release sponge. As it decomposes, it holds moisture during dry spells and releases it gradually to plant roots. It also feeds beneficial fungi, which extend root reach and nutrient access significantly. Hardwood is ideal; avoid treated lumber, black walnut (which is allelopathic), or diseased wood.
If you don't have access to logs, straw bales, bags of wood chips from a tree trimming service (often free), or even shredded cardboard all work in this layer.
The Nitrogen Layer: Green Waste and Kitchen Scraps
After your brown, carbon-rich base, you need a nitrogen-rich layer to kickstart decomposition. Think of this like building a lasagna — alternating wet and dry, green and brown layers creates the heat and biology that turns raw organics into plant-available nutrients.
Good nitrogen sources include:
- Grass clippings (no herbicide-treated grass)
- Vegetable kitchen scraps
- Coffee grounds and tea leaves
- Fresh garden trimmings
- Aged chicken or rabbit manure (well-composted)
Spread this layer 2–4 inches thick and water it well. This is where the biological magic begins.
The Transition Layer: Aged Compost and Manure
Between your rough organic materials and your fine growing mix, add a 3–4 inch layer of finished compost or aged manure. This serves as a biological bridge, connecting the decomposing lower layers to the active root zone above. It also helps prevent nitrogen lockup — a temporary condition where fresh organic matter actually ties up nitrogen as it decomposes, temporarily making it unavailable to plants.
Homemade compost is ideal here, but bagged garden compost works well too. Aged chicken manure, mushroom compost, or worm castings are especially effective.
The Active Growing Zone: Your Premium Top Layer
This is where you spend your budget wisely. The top 8–10 inches of your raised bed should be a high-quality blend designed for active root growth. A popular and effective recipe:
- 40% finished compost (homemade or commercial)
- 30% topsoil or bagged raised bed mix
- 20% aged manure (chicken, cow, or horse)
- 10% perlite or coarse sand (for drainage in wetter climates)
This blend is loose, nutrient-rich, and biologically active from day one. Unlike solid topsoil, it won't compact after the first rain, and it supports the fine root hairs that plants use to absorb water and nutrients.
For gardeners in humid climates who are wondering about the best materials for raised garden beds, this moisture-balanced mix is especially important. Perlite or coarse horticultural sand prevents waterlogging during wet seasons, while the compost retains enough moisture during dry spells to reduce irrigation needs.
Irrigation Considerations for Layered Beds
Here's something many gardeners overlook: a well-layered raised bed changes how you need to water. The organic layers in the lower zone retain moisture far better than pure soil, which means you can often water less frequently — but when you do water, you want to water deeply to reach those lower layers and encourage roots to grow downward.
Drip irrigation systems are an ideal match for layered raised beds. Rather than surface watering that can crust the top layer, drip lines deliver water slowly and directly to the root zone. Many gardeners set up simple timer-controlled drip systems on their raised beds and find that watering time and water usage drop significantly compared to overhead watering methods.
Soaker hoses are a budget-friendly alternative that threads easily between plants and delivers slow, deep irrigation without wetting foliage — which helps reduce fungal disease in humid areas.
Raised Bed Layout Considerations
If you're managing multiple raised beds, your raised bed garden layout affects how well the layering system works at scale. Beds arranged in rows with walkway access on all sides are easiest to fill and amend. Wider beds (like the 8x4 or 12x3 configurations in Anleolife's lineup) benefit most from the layering approach because their greater volume makes topsoil costs significant without layering.
When planning your layout, think about sun exposure (south-facing beds in the northern hemisphere get the most light), pathway width for wheelbarrow access, and proximity to your compost bin or manure source — you'll be adding organic material annually to top off your beds as the lower layers decompose and settle.
Some gardeners also incorporate kinetic wind spinners or other decorative garden elements into their raised bed areas not just for aesthetics but because movement near the garden can help deter certain pests. A thoughtfully designed garden space blends function and beauty — which is exactly the philosophy behind Anleolife's full garden ecosystem approach.
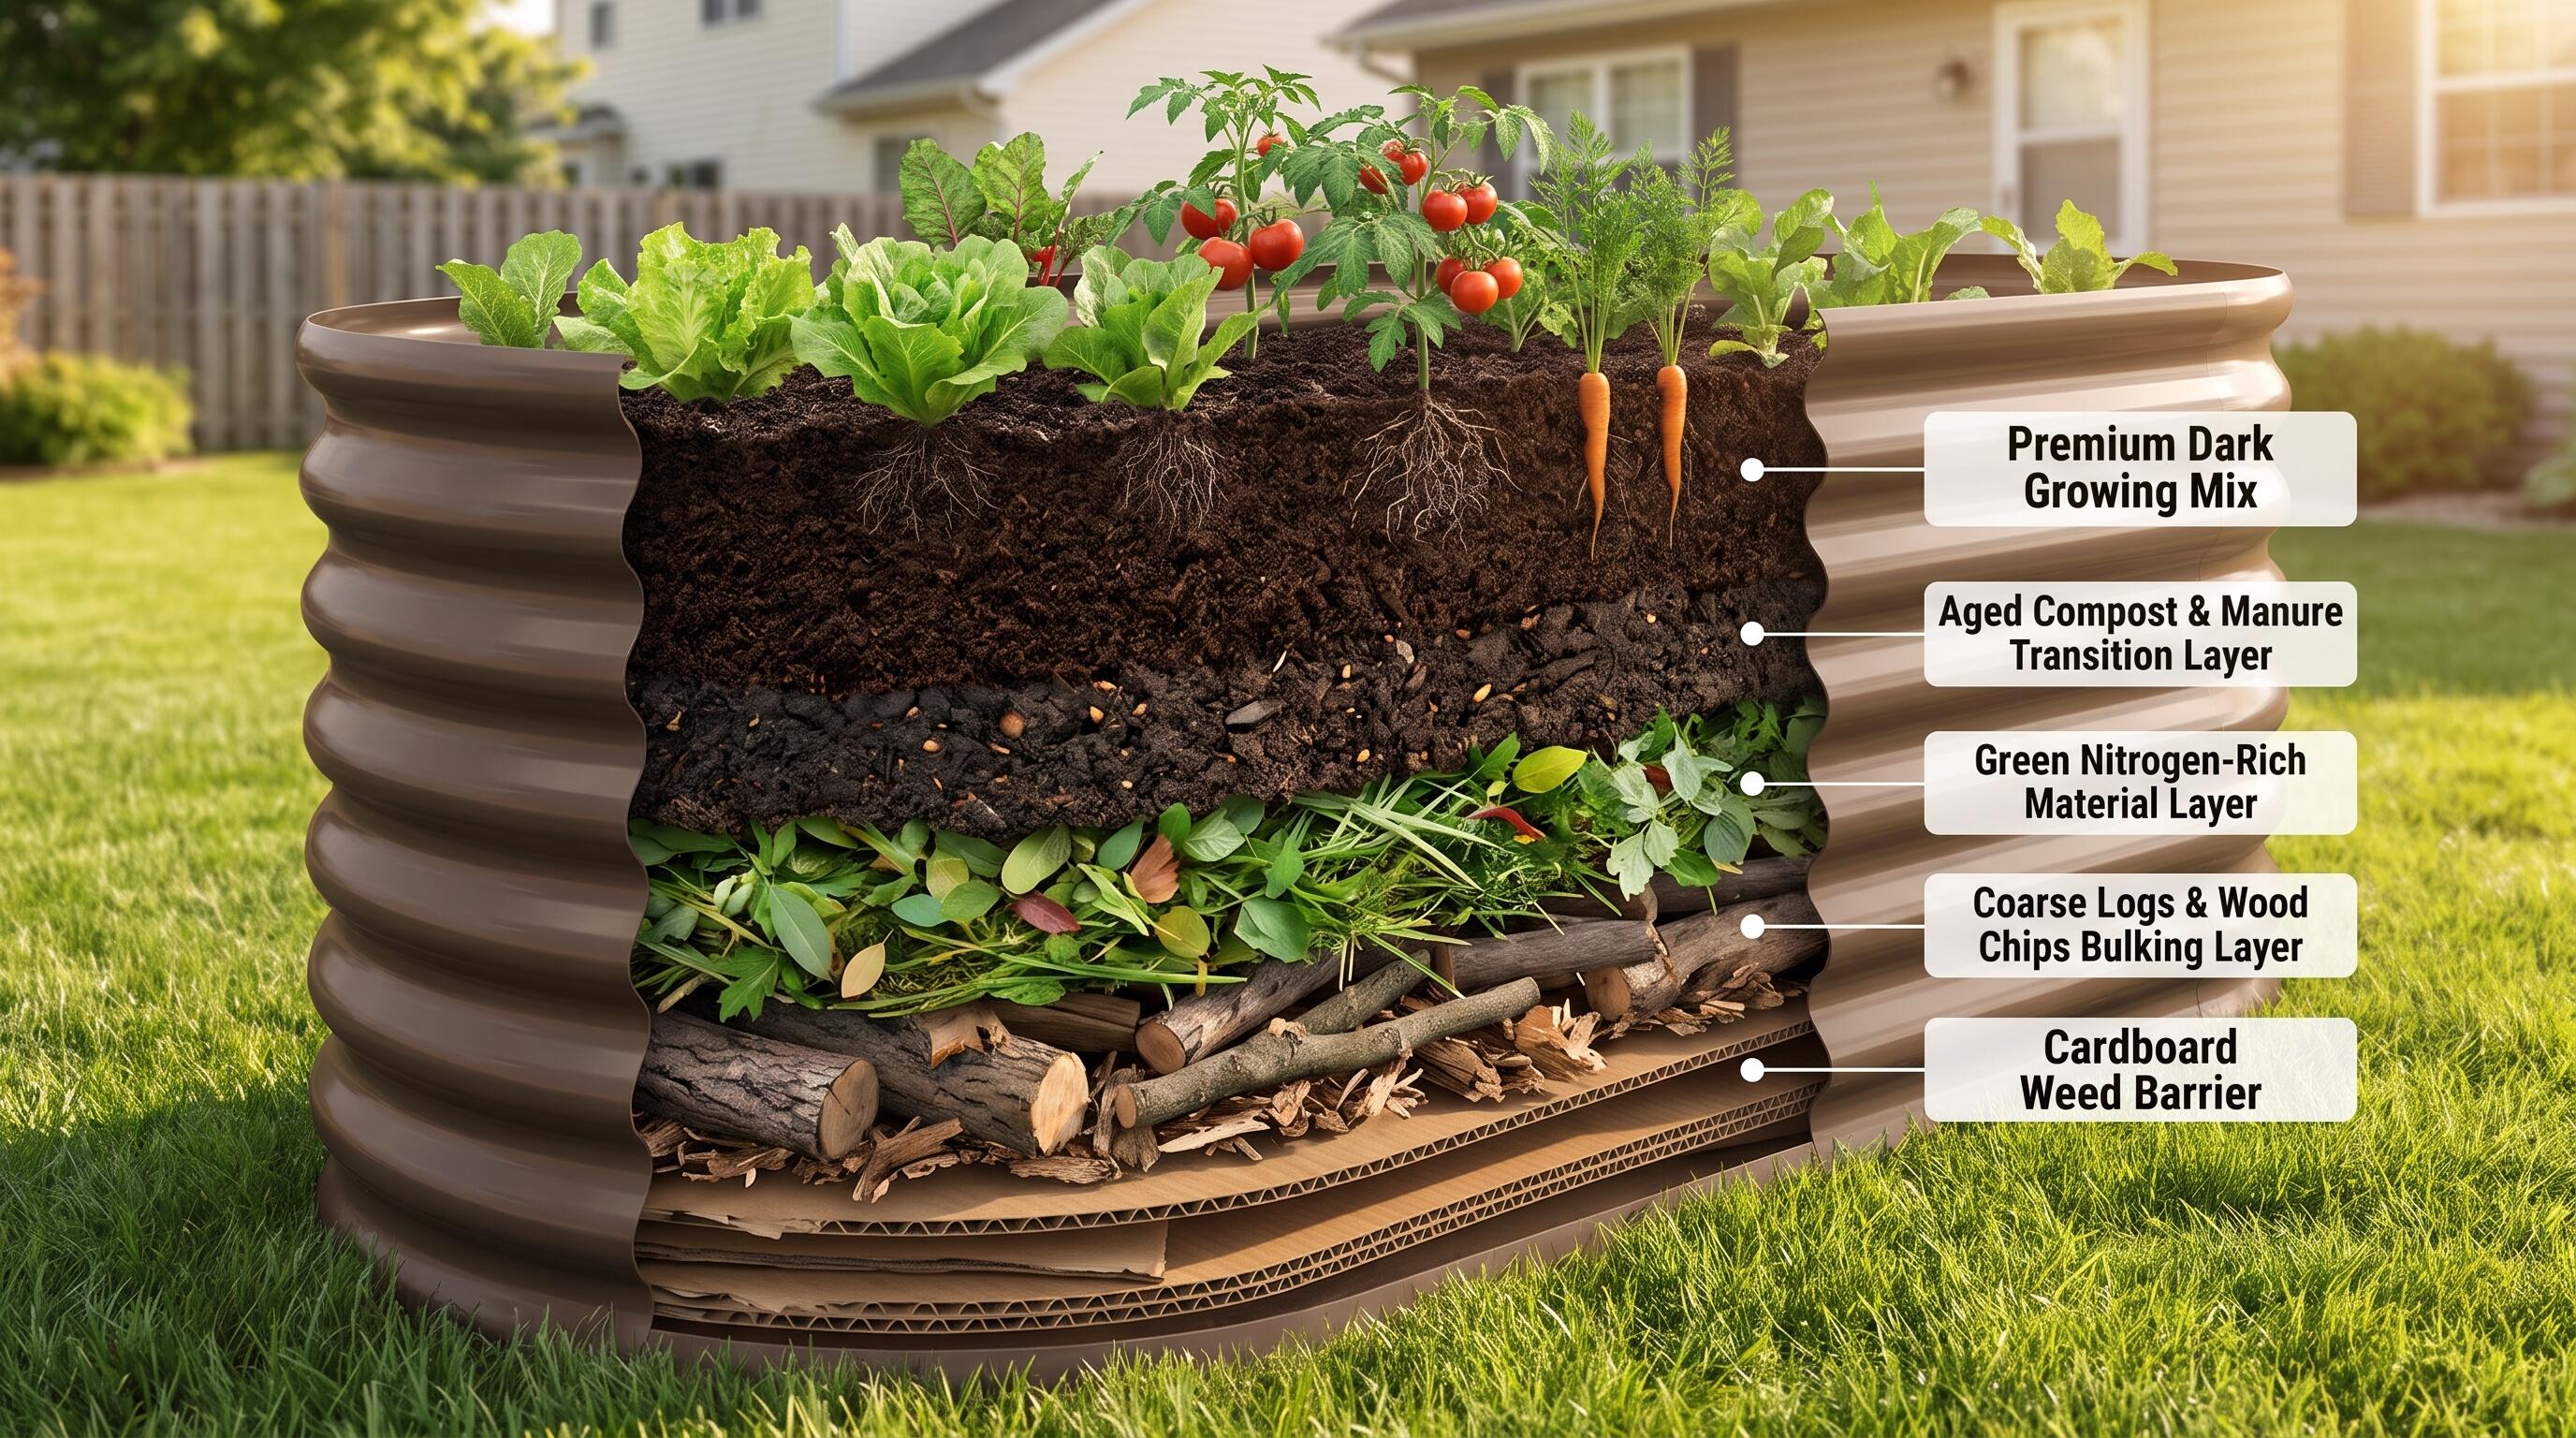
ALT: Cross-section of raised garden bed layering system showing wood chips, compost, manure, and premium topsoil growing zone for vegetables
Advanced Tips: Troubleshooting, Common Misconceptions, and Seasonal Adjustments
Handling Settling After the First Season
One of the most common surprises for first-time layered bed gardeners is settling. As lower organic layers decompose, your bed's volume can decrease by 20–30% in the first year. This is completely normal and actually signals that your biology is working. Simply top off the bed in spring with 2–3 inches of fresh compost. Over time, the bed stabilizes as lower layers fully decompose into humus.
Misconception: You Must Use Expensive Raised Bed Soil Mixes
Many garden centers sell pre-blended "raised bed soil" at premium prices. While these mixes are convenient, they're not necessary for a successful layered bed. In fact, the layering method — using materials you likely already have or can obtain free — builds a more complex, living soil system than any bagged product alone. The key is balance: roughly equal parts carbon (browns) and nitrogen (greens) in your lower layers, topped with premium compost in your growing zone.
Misconception: Galvanized Steel Beds Are Unsafe for Vegetables
A common concern among health-conscious gardeners is whether galvanized steel raised beds are safe for growing food and vegetables. The answer, supported by multiple university extension programs, is yes. Modern galvanized steel uses a zinc coating that is stable at garden temperatures. Zinc is also an essential micronutrient for plants. The amount of zinc that might leach into soil from galvanized beds is far below any level of concern, and numerous studies confirm that food grown in galvanized raised beds is safe to eat. Anleolife's galvanized steel raised garden beds are designed with this in mind, built to last 20 years while remaining safe for your family's food production.
Refreshing the Top Layer Year Over Year
Each spring, before planting season, add a fresh top-dressing of 1–2 inches of compost to your raised beds. This replenishes nutrients depleted by last season's crops, introduces fresh biology, and compensates for any settling. It's also a good time to check the moisture retention of your layers — if the bed seems to be drying out more quickly than it used to, your lower wood layers may have fully decomposed, and it may be time to refresh the middle layers with new organic bulking material.
Frequently Asked Questions FAQ
Q1: How long does it take for the lower organic layers in a raised bed to decompose fully?
The timeline depends on materials used and your climate. Coarse wood and logs can take 2–5 years to fully break down — which is actually a feature, not a bug, since they provide long-term slow-release nutrients. Straw, leaves, and kitchen scraps in the middle layers typically decompose within one growing season. Your top growing zone will be ready to plant immediately if you use finished compost and aged manure. Warm, humid climates speed decomposition; cool and dry climates slow it.
Q2: Is it safe to use wood chips and logs from any tree species in my raised bed layering?
Most untreated hardwood species work well in raised bed layers. However, avoid black walnut, which produces juglone — a compound toxic to many garden plants. Also avoid any wood that has been treated with preservatives, painted, or pressure-treated, as these can introduce harmful chemicals into your growing environment. Cedar and pine are generally fine in moderate quantities. When in doubt, stick to hardwoods like oak, maple, or fruit tree branches, and always source from disease-free trees.
Q3: How much does the layering method actually save compared to buying all topsoil?
Savings vary by bed size and region, but they can be substantial. For a single 8x4x24" raised bed, you might need 40+ cubic feet of growing medium. At typical retail prices, filling that entirely with bagged topsoil or raised bed mix could cost $150–$300 or more. Using the layering method, where lower layers are cardboard, wood chips, and compost (all potentially free or very low cost), you might spend $30–$80 on just the premium top layer — saving 60–80% on your filling costs. Multiply that across multiple beds, and the savings are significant.
Summary
Filling a raised garden bed doesn't have to drain your budget before you've even planted your first seed. The layering method transforms what might feel like a daunting expense into an opportunity to build truly extraordinary growing soil — the kind that improves every year, supports deep root development, and reduces your water and fertilizer inputs over time.
Three core takeaways from this guide:
- Layer from coarse to fine — cardboard at the base, bulky organics in the middle, premium compost blend at the top. Each layer serves a specific purpose and reduces the volume of expensive soil you need.
- Match your approach to your bed depth — deeper beds (24" and above) benefit most dramatically from layering since they have the most volume to fill. Anleolife's Extra Tall and Waist-High raised garden bed options are perfectly sized for this technique.
- Think long-term — a well-built layered bed improves with age. Paired with a durable galvanized steel structure built to last 20 years, your initial investment pays dividends season after season.
Your next step: measure your existing or planned raised bed, estimate how many cubic feet you need to fill, and start sourcing your free organic layers — cardboard, wood chips from a local tree service, fallen leaves, and kitchen scraps. The premium top layer is the only part you need to budget for, and that's where your plants will actually grow.
Start Growing Smarter with Anleolife
Anleolife's nationwide U.S. warehouse network — strategically located in California, Texas, Florida, New York, Illinois, and Washington — ensures your raised bed arrives in just 3–8 business days, so your garden plans don't have to wait for shipping delays.
You'll find Anleolife products on all major platforms: Amazon, Walmart, Home Depot, Lowe's, Wayfair, and directly at Anleolife.com, with consistent quality assurance and responsive after-sales support wherever you shop.
Anleolife's product ecosystem covers every stage of your garden journey — Planting (galvanized steel and rust-resistant raised garden beds, soil systems), Raising (chicken coops, rabbit hutches — and if you're raising backyard chickens, their manure is one of the best nitrogen sources for your layered beds!), and Beautification (decorative accessories, pathway systems) — so you can build from a single starter bed to a fully integrated home garden ecosystem.
We understand that an ideal garden isn't built overnight — it grows with you. Our modular raised garden bed designs allow you to start with one bed and expand your raised bed garden layout as your confidence, space, and ambitions grow. From your first 8x4 bed to a multi-bed kitchen garden with integrated irrigation systems and decorative touches, Anleolife grows with you every step of the way.
References
- National Gardening Association. "Food Gardening in the United States."
https://garden.org - University of California Agriculture and Natural Resources. "Healthy Soils for Sustainable Gardens."
https://ucanr.edu/ - Oregon State University Extension Service. "Raised Bed Gardening."
https://extension.oregonstate.edu/gardening/techniques/raised-bed-gardening - Colorado State University Extension. "Choosing a Soil Mix for Raised Beds."
https://extension.colostate.edu/ - University of Minnesota Extension. "Raised Bed Gardening for Vegetables."
https://extension.umn.edu/vegetables/raised-bed-gardening
Note: Gardening recommendations and soil guidelines may vary by region and are periodically updated. Always check the latest guidance from your local cooperative extension service or consult a certified master gardener for region-specific advice.
About Anleolife
Anleolife is a leading outdoor garden solutions provider in North America, dedicated to offering a full-scenario product ecosystem for home gardening enthusiasts, covering planting, raising, and garden beautification. Since its founding, we have upheld our brand mission, "Made for Garden Life," continuously innovating products and optimizing services to help hundreds of thousands of users upgrade their gardens, reconnect with nature, and enjoy a better garden lifestyle.








